
@TOC
前言
前文我们已经建立好了差速小车的硬件组件,那么谁来给小车发号施令呢?左右车轮应该是多少转速呢?这就是控制器需要回答的问题了。
本文教程的对应源码也完全开源供大家学习,如果您觉得对您有帮助,希望能得到个start鼓励一下: 教程开源代码
那么这一小节,我们继续学习如何手写一个新的控制器吧!
控制器概念
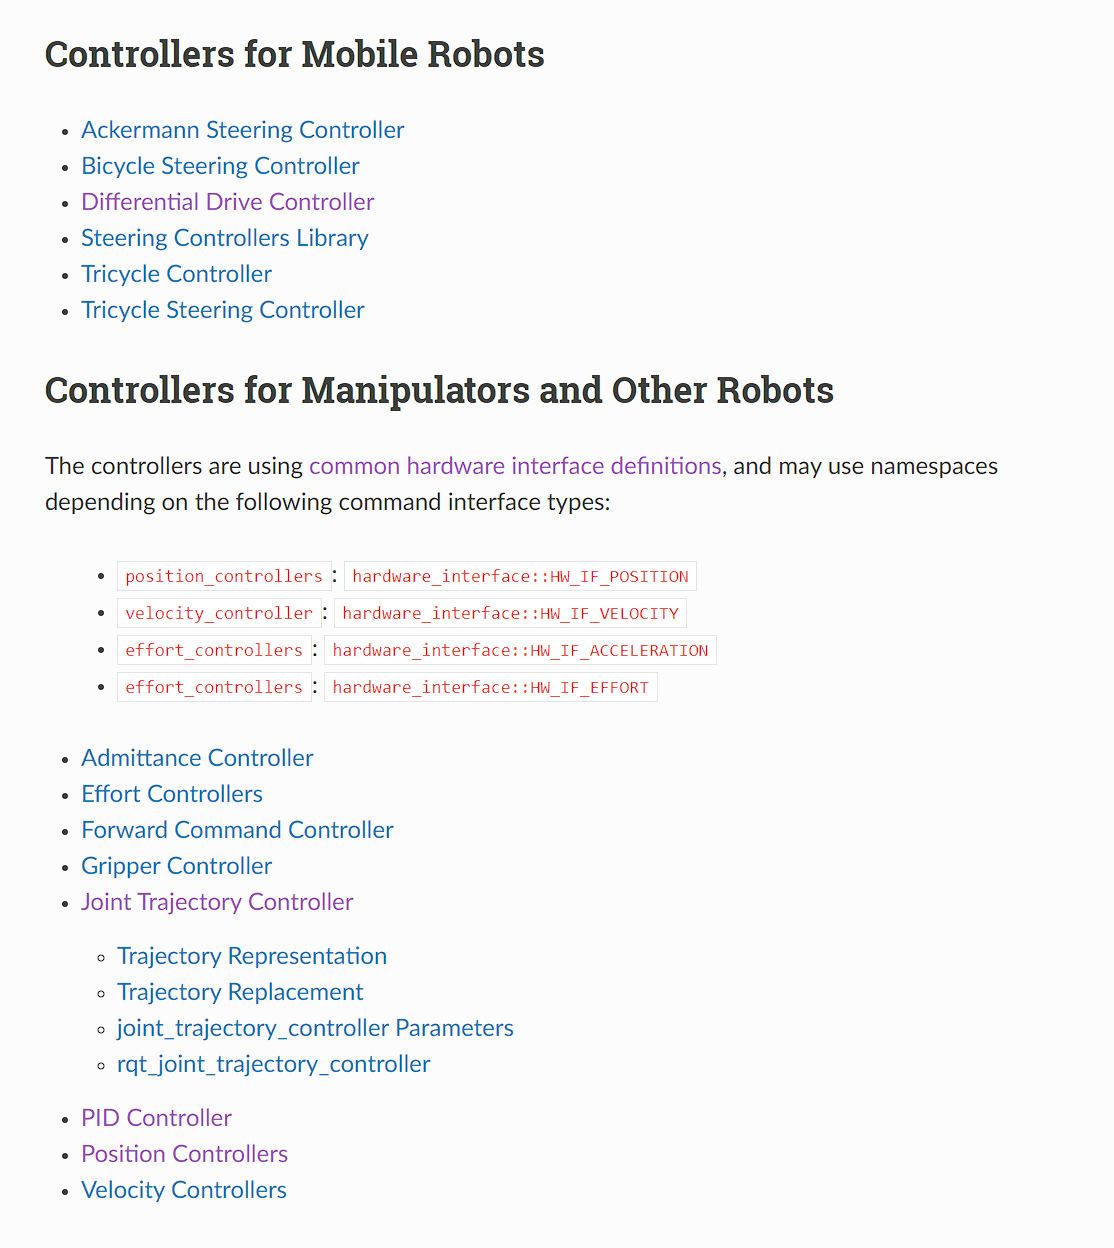
我们知道了控制器是用来与“ROS世界交互”:例如接收、发布话题等,并且能够传递给硬件组件接口。官方给了一些我们能开箱即用的控制器,上面的是关于移动机器人的,下面是关于机械臂或者其他单个执行机构的控制器。
此外还有些特殊的控制器如下图

比如joint_state_broadcaster,它不接收控制信号,但接收所有的关节反馈,也就是state_interface,然后以joint_state的形式发布出来,这个joint_state会被/robot_state_publisher订阅,然后发布到Rviz(如果需要的话)。因此,如果你需要Rviz进行可视化,可以将这个控制器添加上。
创建功能包
ros2 pkg create --build-type ament_cmake diff_test_controller
与硬件组件一样,控制器也是作为一个插件动态库提供给控制器管理器(Controller Manager)调用,为此也需要visibility_control.h暴露动态库。然后我们添加上源文件和头文件diff_test_controller.cpp、diff_test_controller.hpp
自定义控制器
控制器类继承自基类ControllerInterfaceBase,也是一个生命周期节点类。同样我们也需要复写一些基本的回调函数
class DiffTestController : public controller_interface::ControllerInterface
之前讲硬件控制器的时候,我们说了这个基类有两个保护变量commmand_interfaces_和state_interfaces_,控制器可以直接访问这两个变量来与硬件组件交互。这里我们为差速小车的车轮封装一个结构体。结构体里面的是引用变量,我们到时候只需要让commmand_interfaces_和state_interfaces_成为结构体里面feedback和velocity的引用即可。由于差速小车的左右轮子数量可能有多个,这里用的是vector去存放各个车轮的句柄。
struct WheelHandle
  {
    std::reference_wrapper<const hardware_interface::LoanedStateInterface> feedback;
    std::reference_wrapper<hardware_interface::LoanedCommandInterface> velocity;
  };
  std::vector<WheelHandle> registered_left_wheel_handles_;
  std::vector<WheelHandle> registered_right_wheel_handles_;
参数生成监听功能包(generate_parameter_library)
我们在写控制器时候常常需要很多参数,每个参数的声明、设置和获取都需要调用ros2的get_parameter、set_parameter之类的接口。在参数量多的情况下一个个写使得代码有些冗余,并且我们希望参数能够自动更新到变量里面,这时候我们需要介绍generate_parameter_library功能包:generate_parameter_library ROS Index
它可以根据我们写的yaml文件自动帮我们声明、监听参数,参数的变化自动更新到结构体变量里面,使用时非常方便,很不幸这个功能包只支持ROS2 Humble以上的版本,如果是Humble以下只能老老实实一个个在代码里面声明
使用时我们先用yaml文件写好我们需要的参数,新建diff_test_controller_parameter.yaml文件如下:
diff_test_controller:
  right_wheel_names: {
    type: string_array,
    default_value: [],
    description: "Link name of the left side wheels",
  }
  left_wheel_names: {
    type: string_array,
    default_value: [],
    description: "Link name of the left side wheels",
  }
  wheels_per_side: {
    type: int,
    default_value: 0,
    description: "Number of wheels on each side of the robot.",
  }
  wheels_separation: {
    type: double,
    default_value: 0.0,
    description: "Shortest distance between the left and right wheels. If this parameter is wrong, the robot will not behave correctly in curves.",
  }
  wheel_radius: {
    type: double,
    default_value: 0.0,
    description: "Radius of a wheel, used for transformation of linear velocity into wheel rotations. If this parameter is wrong the robot will move faster or slower then expected.",
  }
  linear:
    x:
      velocity_clamp: {
        type: double,
        default_value: .NAN,
        description: "Velocity clamp. Symmetrical in both positive and negative direction.",
      }
  angular:
    z:
      velocity_clamp: {
        type: double,
        default_value: .NAN,
        description: "Velocity clamp. Symmetrical in both positive and negative direction.",
      }
这个和给参数赋初值的那个yaml文件不一样,大家可千万别弄混了,它们写法也不一样。
然后我们在on_init函数内调用接口,这时候params_这个结构体变量就可以作为我们的参数结构体使用了,比如我们在代码里面想要获取right_wheel_names这个参数,只需要params_.right_wheel_names即可。
// Create the parameter listener and get the parameters
    param_listener_ = std::make_shared<ParamListener>(get_node());
    params_ = param_listener_->get_params();
这是一个python脚本帮助我们完成的,会自动生成diff_test_controller_parameter.hpp文件,所以我们在Cmake里面需要加上对应函数,然后作为静态库链接上去
# generate parameter listener hpp file
generate_parameter_library(`diff_test_controller_parameter
 src/`diff_test_controller_parameter.yaml
)
...
target_link_libraries(diff_test_controller PUBLIC diff_test_controller_parameter)
构建command_interface和state_interface
InterfaceConfiguration DiffTestController::command_interface_configuration() const
{
  std::vector<std::string> conf_names;
  for (const auto & joint_name : params_.right_wheel_names) {
    conf_names.push_back(joint_name + "/" + HW_IF_VELOCITY);
  }
  for (const auto & joint_name : params_.left_wheel_names) {
    conf_names.push_back(joint_name + "/" + HW_IF_VELOCITY);
  }
  return {interface_configuration_type::INDIVIDUAL, conf_names};
}

InterfaceConfiguration DiffTestController::state_interface_configuration() const
{
  std::vector<std::string> conf_names;
  for (const auto & joint_name : params_.right_wheel_names) {
    conf_names.push_back(joint_name + "/" + HW_IF_VELOCITY);
  }
  for (const auto & joint_name : params_.left_wheel_names) {
    conf_names.push_back(joint_name + "/" + HW_IF_VELOCITY);
  }
  return {interface_configuration_type::INDIVIDUAL, conf_names};
}
正如硬件组件里面我们导出command_interface和state_interface一样,我们到控制器里面要先构建声明接口。
配置(on_configure)和激活(onActivate)
我们在这两个函数里面,主要做了创建发布者、订阅者,检查传入参数还有初始化轮式里程计之类的事情,在onActivate函数里面,我们调用configure_side来把保护变量commmand_interfaces_和state_interfaces_变成我们私有句柄registered_left_wheel_handles_和registered_right_wheel_handles_的引用,源码如下:
controller_interface::CallbackReturn DiffTestController::configure_side(
  const std::string & wheel_kind,
  const std::vector<std::string> & wheel_names,
  std::vector<wheelHandle> & registered_handles)
{
  auto logger = get_node()->get_logger();

  if (wheel_names.empty()) {
    RCLCPP_ERROR(logger, "No '%s' motor names specified", wheel_kind.c_str());
    return controller_interface::CallbackReturn::ERROR;
  }
  // register handles
  registered_handles.reserve(wheel_names.size());
  for (const auto & wheel_name : wheel_names) {
    const auto state_handle = std::find_if(
      state_interfaces_.cbegin(), state_interfaces_.cend(),
      [&wheel_name](const auto & interface)
      {
        return interface.get_prefix_name() == wheel_name &&
        interface.get_interface_name() == HW_IF_VELOCITY;
      });

    if (state_handle == state_interfaces_.cend()) {
      RCLCPP_ERROR(logger, "Unable to obtain motor state handle for %s", wheel_name.c_str());
      return controller_interface::CallbackReturn::ERROR;
    }

    const auto command_handle = std::find_if(
      command_interfaces_.begin(), command_interfaces_.end(),
      [&wheel_name](const auto & interface)
      {
        return interface.get_prefix_name() == wheel_name &&
        interface.get_interface_name() == HW_IF_VELOCITY;
      });

    if (command_handle == command_interfaces_.end()) {
      RCLCPP_ERROR(logger, "Unable to obtain motor command handle for %s", wheel_name.c_str());
      return controller_interface::CallbackReturn::ERROR;
    }

    registered_handles.emplace_back(
      wheelHandle{std::ref(*state_handle), std::ref(
          *command_handle)});
  }

  return controller_interface::CallbackReturn::SUCCESS;
}
我们知道,硬件组件export出来的变量有很多,而且硬件组件也肯定不只有一个,那我们怎么找到对应的硬件组件的变量呢?答案就是通过名字和接口类型,我们参数里面写出我们要调用的接口的名字,然后把对应的commmand_interfaces_和state_interfaces_成为我们句柄的引用,我们操纵这个引用变量即可完成对硬件组件里面的值的访问。从这里我们也可以看出来,控制器是如何对应上硬件组件的了,这真的是ros2-control的漂亮的解耦设计。
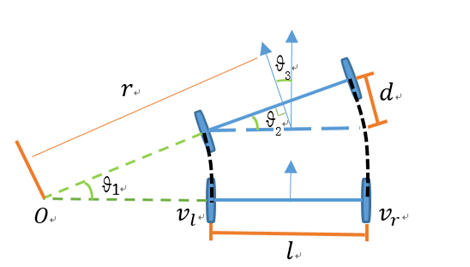
差速小车运动学
在控制器运行过程中,我们接收Twist格式的话题作为控制指令,对于差速小车,我们其实只关注前进速度vx和角速度wz。差速小车的逆运动学就是实现给定线速度和角速度,计算出轮子达到怎样的转速才能达到这个速度。

我们已知左右两轮的轮间距,那么机器人前进速度按照两轮中点速度有:
$$
v = (v_r+v_l)/2
$$
角速度根据几何关系计算得出:
$$
\omega = (v_r-v_l)/l
$$
联立上述两个等式可以得到运动学逆解:
$$
v_l = v - \frac{\omega l}{2}
$$
$$
v_r = v + \frac{\omega l}{2}
$$
当然这只是左右车轮的线速度,要得到电机转速还需要除上车轮的半径。
轮式里程计
移动机器人的定位问题可阐述为:机器人根据自身状态、传感器信息实时确定自己在世界(全局或局部)中的位置与姿态。 轮式里程计是一种最简单,获取成本最低的方法。轮式里程计采用的电机转速测量模块,如果知道轮子的周长,我们便可以通过车轮转了多少圈来获取轮子走过的路程,从而算出位置。除此之外还有其他的定位方包括视觉里程计、激光里程计、惯性导航模块(IMU+GPS)以及多传感器融合。
由于存在车轮打滑、测速不准等原因,实际情况通常是多传感器定位,这里我们做的只是简单例子,没有复杂的传感器,我们就通过轮式里程计来计算小车位置,然后转化TF发布出去。
假定我们可以得到小车的两轮转速,那么根据运动学正解,我们可以得到小车的整体的速度和角速度.
这里我们利用下微积分的思想,差速小车在平面内作圆周运动(直线也可以看做一种圆周运动,$r \to \infty$)
t时间内转过的角度为角速度$\omega$,圆周走过的弧长即为小车走过的路程,那么就可以得式子
$$
\theta_{t+1} = \theta + \omega t
$$
$$
x{t+1} = x_t + r * (sin \theta{t+1} - sin \theta)
$$
$$
y{t+1} = y_t - r * (cos \theta{t+1} - cos \theta)
$$
其中$r$为
$$
r = \frac{v}{\omega}
$$
如果此时角速度非常小,则$r \to \infty$,我们认为小车在做直线运动
计算小车当前的朝向,根据二阶龙格-库塔法
$$
\theta_{t+1} = \theta + \frac{\dot\theta}{2}
$$
$$
x{t+1} = x_t + vt * cos{\theta{t+1}}
$$
$$
y{t+1} = y_t + vt * sin{\theta{t+1}}
$$
反应在代码里面则为
void Odometry::integrate(double linear, double angular, double dt)
{
  if (fabs(angular) < 1e-6)
  {
    //若角速度过小,认为基本在走直线,采用二阶龙格-库塔法积分
    const double direction = heading_ + angular * 0.5;
    x_ += linear * cos(direction) * dt;
    y_ += linear * sin(direction) * dt;
    heading_ += angular * dt;
  }
  else
  {
    const double heading_old = heading_;
    const double r = linear / angular;
    heading_ += angular * dt;
    x_ += r * (sin(heading_) - sin(heading_old));
    y_ += -r * (cos(heading_) - cos(heading_old));
  }
}
update()函数
前文铺垫了那么多,终于到我们的大头update函数了,作为周期性执行的回调函数,我们在这个里面实现我们的控制逻辑,代码如下:
controller_interface::return_type DiffTestController::update(
  const rclcpp::Time & time, const rclcpp::Duration & period)
{
  auto logger = get_node()->get_logger();
  //if controller unload
  if (get_state().id() == State::PRIMARY_STATE_INACTIVE) {
    if (!is_halted) {
      halt();
      is_halted = true;
    }
    return controller_interface::return_type::OK;
  }

  //update param
  this->params_ = param_listener_->get_params();


  //update cmd
  std::shared_ptr<Twist> last_command_msg;
  received_velocity_msg_ptr_.get(last_command_msg);

  if (last_command_msg == nullptr) {
    RCLCPP_WARN(logger, "Velocity message received was a nullptr.");
    return controller_interface::return_type::ERROR;
  }


  // command may be limited
  Twist command = *last_command_msg;
  // Unit m/s
  linear_command = std::clamp(
    command.linear.x, -params_.linear.x.velocity_clamp,
    params_.linear.x.velocity_clamp);
  // Unit rad/s
  angular_command = std::clamp(
    command.angular.z, -params_.angular.z.velocity_clamp,
    params_.angular.z.velocity_clamp);

    //获取转速反馈,如果每边有多个车轮,计算平均值
    double left_feedback_mean = 0.0;
    double right_feedback_mean = 0.0;
    for (size_t index = 0; index < static_cast<size_t>(params_.wheels_per_side); ++index)
    {
      const double left_feedback = registered_left_wheel_handles_[index].feedback.get().get_value();
      const double right_feedback =
        registered_right_wheel_handles_[index].feedback.get().get_value();

      if (std::isnan(left_feedback) || std::isnan(right_feedback))
      {
        RCLCPP_ERROR(
          logger, "Either the left or right wheel %s is invalid for index [%zu]", "velocity",
          index);
        return controller_interface::return_type::ERROR;
      }

      left_feedback_mean += left_feedback;
      right_feedback_mean += right_feedback;
    }
    left_feedback_mean /= params_.wheels_per_side;
    right_feedback_mean /= params_.wheels_per_side;
    //里程计积分更新
    odometry_.update(
        left_feedback_mean * params_.wheel_radius,
        right_feedback_mean * params_.wheel_radius, time);

    //欧拉角转四元数
    tf2::Quaternion orientation;
    orientation.setRPY(0.0, 0.0, odometry_.getHeading());

    if (realtime_odometry_publisher_->trylock())
    {
        auto & odometry_message = realtime_odometry_publisher_->msg_;
        odometry_message.header.stamp = time;
        odometry_message.pose.pose.position.x = odometry_.getX();
        odometry_message.pose.pose.position.y = odometry_.getY();
        odometry_message.pose.pose.orientation.x = orientation.x();
        odometry_message.pose.pose.orientation.y = orientation.y();
        odometry_message.pose.pose.orientation.z = orientation.z();
        odometry_message.pose.pose.orientation.w = orientation.w();
        odometry_message.twist.twist.linear.x = odometry_.getLinear();
        odometry_message.twist.twist.angular.z = odometry_.getAngular();
        realtime_odometry_publisher_->unlockAndPublish();
    }

    if (realtime_odometry_transform_publisher_->trylock())
    {
        auto & transform = realtime_odometry_transform_publisher_->msg_.transforms.front();
        transform.header.stamp = time;
        transform.transform.translation.x = odometry_.getX();
        transform.transform.translation.y = odometry_.getY();
        transform.transform.rotation.x = orientation.x();
        transform.transform.rotation.y = orientation.y();
        transform.transform.rotation.z = orientation.z();
        transform.transform.rotation.w = orientation.w();
        realtime_odometry_transform_publisher_->unlockAndPublish();
    }


  // Compute wheels velocities:  Unit m/s
  const double velocity_right =
    (linear_command + angular_command * params_.wheels_separation / 2.0);
  const double velocity_left =
    (linear_command - angular_command * params_.wheels_separation / 2.0);

  // Set wheels velocities:
  for (size_t index = 0; index < static_cast<size_t>(params_.wheels_per_side); ++index) {
    registered_left_wheel_handles_[index].velocity.get().set_value(velocity_left / params_.wheel_radius);
    registered_right_wheel_handles_[index].velocity.get().set_value(velocity_right / params_.wheel_radius);
  }

  return controller_interface::return_type::OK;
}
这里面也非常简单,首先更新参数,从RealtimeBox获取接收到的Twist类型的控制命令,然后读取硬件组件read后更新的车轮的实际速度,带入轮式里程计积分,然后把里程计和TF变换的数据pub出去。最后逆运动学解算出两边车轮的控制线速度,然后赋车轮的转速值给句柄引用。
导出插件
与硬件组件一样,控制器也是以插件形式提供,所以别忘记了新增diff_test_plugin.xml文件
<library path="diff_test_controller">
  <class name="diff_test_controller/DiffTestController"
  type="diff_test_controller::DiffTestController"
  base_class_type="controller_interface::ControllerInterface">
  <description>
    Diff_drive controller.
  </description>
  </class>
</library>
总结
本文手把手带你学习了如何写一个新的控制器的过程,介绍了generate_parameter_library这个方便的功能包,还补充了关于差速小车运动学求解和轮式里程计的相关知识。整个代码初看下来可能会感到头疼,笔者也是慢慢去啃官方的源码,成功没有捷进,下一节我们继续学习如何让整个框架运作,通过实验来验证我们代码的成功与否吧!
如果对其中有问题不清楚,欢迎大家给我私信留言或者加入我创建的一个小的交流群一起学习交流QQ-536788289
写作不易,如果对您有帮助,麻烦点个star★★★加个关注吧!我会继续努力分享更多ROS2小知识
版权声明:本文为博主机器小狗史努比原创文章,未经博主允许不得转载。
