
@TOC
前言
前文我们带大家一起用完成了差速小车的建模,不仅是在RVIZ中可视化,URDF同样也描述了ros2-control的控制信息,正是在这段URDF描述中指定了选用哪个硬件组件。硬件组件可以说是驱动硬件的驱动代码,比如我们想让电机转速达到60rpm,就需要通过串口或者PWM或者CAN等方式控制电机,硬件组件就是连接这一层用的。
硬件组件是需要我们自行编写的,它把所有的硬件行为统一抽象为了read()和write(),read()读取传感器信息或状态,write()可以发送指令等等,我们就是要指定这两个函数里面的逻辑。官方的差速小车例子中的硬件组件read()和write()并没有真实操纵什么硬件,因为只是个例子,为了保证没有实际硬件也能跑通罢了,单纯打印了文本出来。我这里也没有实际硬件,我们就以发布和接收话题的方式假装我们控制电机和读取信息吧,ok,我们的硬件组件就以这个为蓝本开始吧!
本文教程的对应源码也完全开源供大家学习,如果您觉得对您有帮助,希望能得到个start鼓励一下: 教程开源代码
那么这一小节,我们继续我们的学习,手写差速小车的硬件组件!
写属于自己的硬件组件
环境
- ros2版本 Humble
- WSL2-Ubuntu-22.04
创建源文件
接着上一小节工程,我们在src和include文件夹下创建硬件组件的cpp和头文件,分别为diff_test_system.cpp、diff_test_system.hpp、visibility_control.h
动态库可见
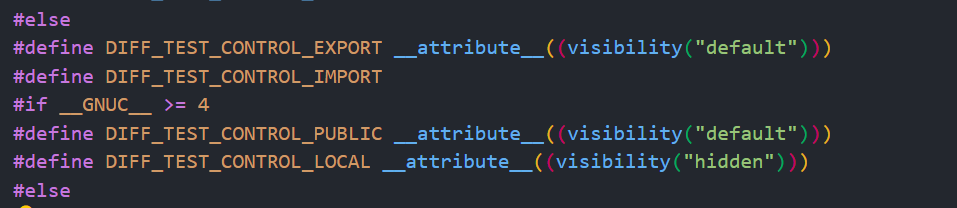
大家打开visibility_control.h里面的文件,会发现这里面是一些宏定义。在Linux下动态库(.so)中,通过GCC的C++ visibility属性可以控制共享文件导出符号。在GCC 4.0及以上版本中,有个visibility属性,可见属性可以应用到函数、变量、模板以及C++类。因为我们说硬件组件是以插件,也就是动态库形式提供,这个宏定义的作用就是让动态库中函数可见。
生命周期节点
在写自己的硬件组件之前,我想有必要跟大家介绍一下ROS2的新特性,生命周期节点。生命周期节点是ROS 2独有的。它是包含ROS 2服务器启动和停止时的状态机转换,用于确定ROS系统启动和关闭的状态是否正常。也就是说我们可以通过命令行或者程序进行交互,控制我们节点的激活与关闭等。
生命周期节点有以下状态:
- 未配置(unconfigured):节点开始时的第一个状态,并在出现错误后结束。没有执行,其主要目的是错误恢复。
- 非活跃(inactivated): 节点持有资源(发布者、监听者等)和配置(参数、内部变量),但什么也不做。 没有执行,没有传输,传入的数据可以保存在缓冲区中,但不能读取。 主要目的是允许重新配置。
- 活跃(activated):一切正常。 和正常节点一样执行。
- 已完成(shutdown):节点已被销毁。 仅用于调试。
对于一个生命周期节点,用户代码需要实现执行标准化的回调函数。
- 配置 - 执行
onConfigure()- 加载配置、冗长的设置步骤、获取节点生命周期内使用的资源,如常量发布者/侦听器、内存缓冲区分配等… - 清理- 执行
onCleanup()- 放弃资源,擦除内存。 新的开始,清理状态。 - 激活 - 执行
onActivate()- 获取传感器等短期资源,激活所有资源。 设置时间短。 启动主节点任务。 - 停用 - 执行
onDeactivate()- 反向Activatingsteps(反激活)。 暂停执行,释放短期资源。 - 关闭 - 执行
onShutdown()- 最后步骤。 删除剩下的资源等。 没有信息从此处回来。 - 错误处理- 执行
onError()- 错误处理状态。 如果错误可以处理,则恢复到 Unconfigured,否则,转到 Finalized 销毁节点。
硬件组件
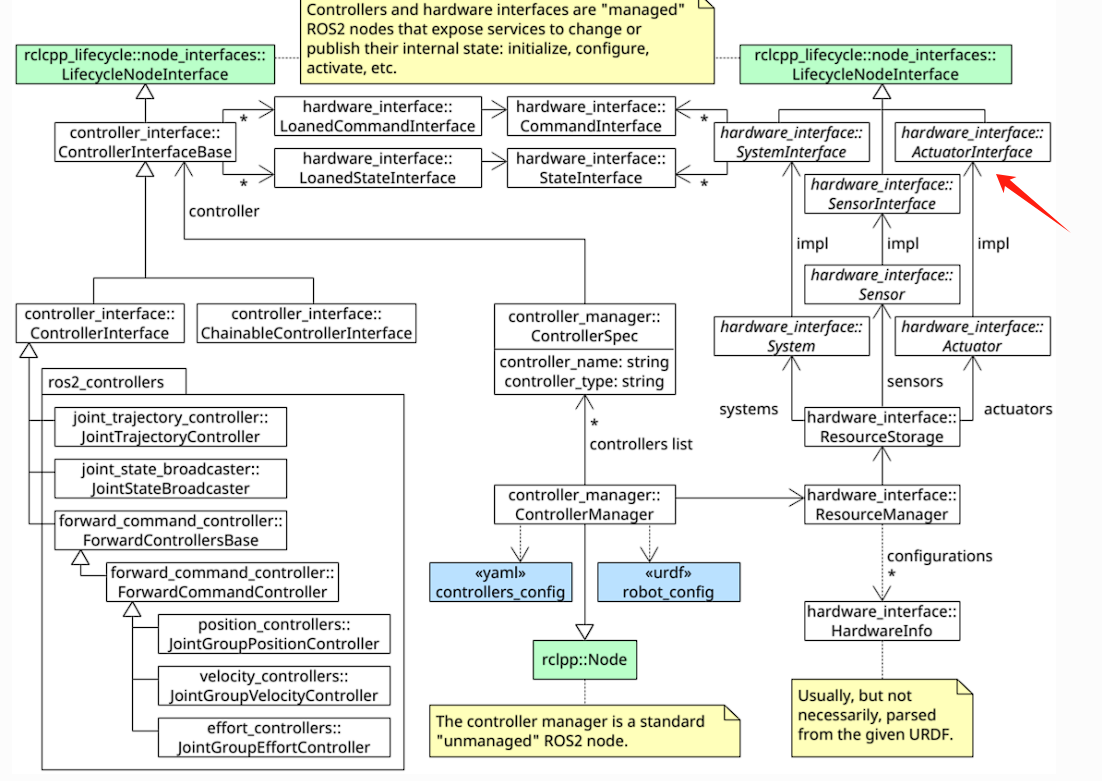
如下图我们可以看到硬件组件类hardware_interface都是继承自生命周期节点类,我们写自己的硬件组件也就是继承hardware_interface类,所以必要的生命周期节点的回调函数我们也得override。
因为我们的硬件组件类型是system,这里我们新建一个我们自己的硬件组件类来继承hardware_interface::SystemInterface
class DiffTestSystemHardware : public hardware_interface::SystemInterface
on_init这个函数是初始化的执行回调,大家在上节应该还记得command_interface和state_interface这两个概念,hw_positions_、hw_velocities_和hw_commands_就是记录两个状态和一个控制命令的变量。
hardware_interface::CallbackReturn DiffTestSystemHardware::on_init(
  const hardware_interface::HardwareInfo & info)
{
  if (
    hardware_interface::SystemInterface::on_init(info) !=
    hardware_interface::CallbackReturn::SUCCESS)
  {
    return hardware_interface::CallbackReturn::ERROR;
  }

  hw_positions_.resize(info_.joints.size(), std::numeric_limits<double>::quiet_NaN());
  hw_velocities_.resize(info_.joints.size(), std::numeric_limits<double>::quiet_NaN());
  hw_commands_.resize(info_.joints.size(), std::numeric_limits<double>::quiet_NaN());

  for (const hardware_interface::ComponentInfo & joint : info_.joints)
  {
    // DiffBotSystem has exactly two states and one command interface on each joint
    if (joint.command_interfaces.size() != 1)
    {
      RCLCPP_FATAL(
        rclcpp::get_logger("DiffTestSystemHardware"),
        "Joint '%s' has %zu command interfaces found. 1 expected.", joint.name.c_str(),
        joint.command_interfaces.size());
      return hardware_interface::CallbackReturn::ERROR;
    }

    if (joint.command_interfaces[0].name != hardware_interface::HW_IF_VELOCITY)
    {
      RCLCPP_FATAL(
        rclcpp::get_logger("DiffTestSystemHardware"),
        "Joint '%s' have %s command interfaces found. '%s' expected.", joint.name.c_str(),
        joint.command_interfaces[0].name.c_str(), hardware_interface::HW_IF_VELOCITY);
      return hardware_interface::CallbackReturn::ERROR;
    }

    if (joint.state_interfaces.size() != 2)
    {
      RCLCPP_FATAL(
        rclcpp::get_logger("DiffTestSystemHardware"),
        "Joint '%s' has %zu state interface. 2 expected.", joint.name.c_str(),
        joint.state_interfaces.size());
      return hardware_interface::CallbackReturn::ERROR;
    }

    if (joint.state_interfaces[0].name != hardware_interface::HW_IF_POSITION)
    {
      RCLCPP_FATAL(
        rclcpp::get_logger("DiffTestSystemHardware"),
        "Joint '%s' have '%s' as first state interface. '%s' expected.", joint.name.c_str(),
        joint.state_interfaces[0].name.c_str(), hardware_interface::HW_IF_POSITION);
      return hardware_interface::CallbackReturn::ERROR;
    }

    if (joint.state_interfaces[1].name != hardware_interface::HW_IF_VELOCITY)
    {
      RCLCPP_FATAL(
        rclcpp::get_logger("DiffTestSystemHardware"),
        "Joint '%s' have '%s' as second state interface. '%s' expected.", joint.name.c_str(),
        joint.state_interfaces[1].name.c_str(), hardware_interface::HW_IF_VELOCITY);
      return hardware_interface::CallbackReturn::ERROR;
    }
  }

  return hardware_interface::CallbackReturn::SUCCESS;
}
on_init的传入的参数const hardware_interface::HardwareInfo & info就是根据urdf解析出来的硬件信息结构体
struct HardwareInfo
{
  std::string name;
  std::string type;
  std::string hardware_class_type;
  std::unordered_map<std::string, std::string> hardware_parameters;
  std::vector<ComponentInfo> joints;
  std::vector<ComponentInfo> sensors;
  std::vector<ComponentInfo> gpios;
  std::vector<TransmissionInfo> transmissions;
  std::string original_xml;
};
这函数大家应该也很容易看懂,就是指定URDF写入command_interfaces必须只有一个就是速度,state_interface有两个,分别是速度和位置。然后Joint有多少,必须要是成双成对,不然还叫啥差速小车。
std::vector<hardware_interface::StateInterface> DiffTestSystemHardware::export_state_interfaces()
{
  std::vector<hardware_interface::StateInterface> state_interfaces;
  for (auto i = 0u; i < info_.joints.size(); i++)
  {
    state_interfaces.emplace_back(hardware_interface::StateInterface(
      info_.joints[i].name, hardware_interface::HW_IF_POSITION, &hw_positions_[i]));
    state_interfaces.emplace_back(hardware_interface::StateInterface(
      info_.joints[i].name, hardware_interface::HW_IF_VELOCITY, &hw_velocities_[i]));
  }

  return state_interfaces;
}

std::vector<hardware_interface::CommandInterface> DiffTestSystemHardware::export_command_interfaces()
{
  std::vector<hardware_interface::CommandInterface> command_interfaces;
  for (auto i = 0u; i < info_.joints.size(); i++)
  {
    command_interfaces.emplace_back(hardware_interface::CommandInterface(
      info_.joints[i].name, hardware_interface::HW_IF_VELOCITY, &hw_commands_[i]));
  }

  return command_interfaces;
}
export_state_interfaces和export_command_interfaces这两个函数就是导出接口,这里可能理解起来比较抽象,需要弄懂点控制器。所有控制器都继承与基类ControllerInterfaceBase,这个基类有保护变量

这两个函数就是把硬件组件里面的hw_positions_、hw_velocities_和hw_commands_变成commmand_interfaces_和state_interfaces_的引用,使得我们在写控制器的时候,直接对commmand_interfaces_赋值和读取state_interfaces_来完成与硬件组件的交互。
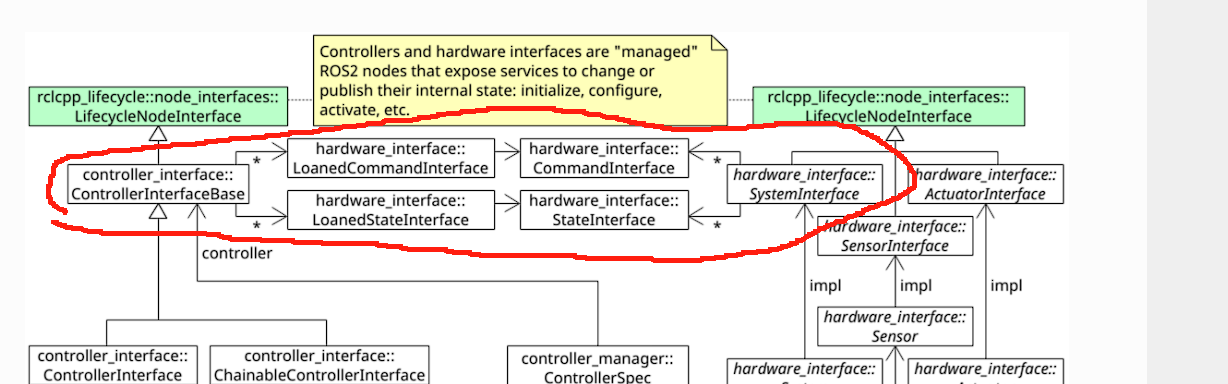
就是上图圈起来的部分,有一说一这张图对于整个框架的理解很重要。
hardware_interface::CallbackReturn DiffTestSystemHardware::on_activate(
  const rclcpp_lifecycle::State & /*previous_state*/)
{
  // BEGIN: This part here is for exemplary purposes - Please do not copy to your production code
  RCLCPP_INFO(rclcpp::get_logger("DiffTestSystemHardware"), "Activating ...please wait...");
  // END: This part here is for exemplary purposes - Please do not copy to your production code

  // set some default values
  for (auto i = 0u; i < hw_positions_.size(); i++)
  {
    if (std::isnan(hw_positions_[i]))
    {
      hw_positions_[i] = 0;
      hw_velocities_[i] = 0;
      hw_commands_[i] = 0;
    }
  }
  subscriber_is_active_ = true;

  this->node_ =  std::make_shared<rclcpp::Node>("hardware_node");

  std_msgs::msg::Float64MultiArray empty_int16array;
  for(std::size_t i = 0; i < hw_positions_.size(); i++)
  {
    empty_int16array.data.push_back(0.0);
  }
    received_fb_msg_ptr_.set(std::make_shared<std_msgs::msg::Float64MultiArray>(empty_int16array));

  fb_subscriber_ =
    this->node_->create_subscription<std_msgs::msg::Float64MultiArray>(
        DEFAULT_STATE_TOPIC, rclcpp::SystemDefaultsQoS(),
        [this](const std::shared_ptr<std_msgs::msg::Float64MultiArray> msg) -> void
        {
            if (!subscriber_is_active_)
            {
                RCLCPP_WARN(
                this->node_->get_logger(), "Can't accept new commands. subscriber is inactive");
                return;
            }
            received_fb_msg_ptr_.set(std::move(msg));

        });


    //创建实时Publisher
    cmd_publisher = this->node_->create_publisher<std_msgs::msg::Float64MultiArray>(DEFAULT_COMMAND_TOPIC, rclcpp::SystemDefaultsQoS());
    realtime_cmd_publisher_ = std::make_shared<realtime_tools::RealtimePublisher<std_msgs::msg::Float64MultiArray>>(cmd_publisher);

  RCLCPP_INFO(rclcpp::get_logger("DiffTestSystemHardware"), "Successfully activated!");

  return hardware_interface::CallbackReturn::SUCCESS;
}
on_activate函数主要是生成节点用来发布订阅,创建发布者和订阅者。这里细心的同学可能发现,这里我用到了实时工具,发布用了实时发布者类RealtimePublisher,订阅用了一个实时缓冲RealtimeBox。RealtimePublisher构造时候需要传入一个Publisher,这个类会开启一个线程专门的去发布,使得具有更高的实时响应性。RealtimeBox就是一个线程安全的容器,在订阅回调里面把新数据存放在这个容器里面以便线程安全的访问。
hardware_interface::return_type diff_test_control::DiffTestSystemHardware::read(
  const rclcpp::Time & /*time*/, const rclcpp::Duration & period)
{
  std::shared_ptr<std_msgs::msg::Float64MultiArray> fb_msg;
  received_fb_msg_ptr_.get(fb_msg);
  rclcpp::spin_some(this->node_);
  for (std::size_t i = 0; i < hw_positions_.size(); i++)
  {
    // Update the joint status: this is a revolute joint without any limit.
    if(i < hw_velocities_.size())
    {
      hw_velocities_[i] = fb_msg->data[i];
      hw_positions_ [i] += period.seconds() * hw_velocities_[i];
    }
  }

  return hardware_interface::return_type::OK;
}
read函数内的程序就比较简单了,读取硬件状态,这里我们的硬件是通过话题来接收的,所以把RealtimeBox里面的值赋给hw_velocities_,然后轮子的位置是直接对速度积分即可
hardware_interface::return_type diff_test_control::DiffTestSystemHardware::write(
  const rclcpp::Time & /*time*/, const rclcpp::Duration & /*period*/)
{
      if(realtime_cmd_publisher_->trylock())
      {
          auto & cmd_msg = realtime_cmd_publisher_->msg_;
          cmd_msg.data.resize(hw_commands_.size());
          for (auto i = 0u; i < hw_commands_.size(); i++)
          {
            cmd_msg.data[i] = hw_commands_[i];
          }
          realtime_cmd_publisher_->unlockAndPublish();
      }

  return hardware_interface::return_type::OK;
}
write函数是把命令值发出去,由于hw_commands_变成commmand_interfaces_的引用,commmand_interfaces_的控制值会在控制器update函数计算完成,这里我们直接将hw_commands_的值发布出去即可,这里注意,实时发布者是有个线程一直准备发布,所以发布时候需要获取锁资源。
最后在cpp文件末尾别忘记加上,便于导出类
#include "pluginlib/class_list_macros.hpp"
PLUGINLIB_EXPORT_CLASS(
  diff_test_control::DiffTestSystemHardware, hardware_interface::SystemInterface)
除此之外还需要再功能包目录下新建一个xml说明文件,类似于package.xml
<library path="diff_test_control">
  <class name="diff_test_control/DiffTestSystemHardware"
         type="diff_test_control::DiffTestSystemHardware"
         base_class_type="hardware_interface::SystemInterface">
    <description>
    DiffTestSystemHardware using a system hardware interface-type.
    </description>
  </class>
</library>
更多具体的代码细节请参考:教程开源代码
总结
本文完成了对一个两轮差速小车的硬件组件编写,由于没有实际硬件,我们用发布接收话题来交互。简要的介绍了生命周期节点和实时工具,硬件组件作为与实际硬件打交道的驱动层,有着很重要的作用,同时硬件组件是如何把接口导出的是一个理解上的重难点,感兴趣可以看看ros2-control的源码。
如果对其中有问题不清楚,欢迎大家给我私信留言或者加入我创建的一个小的交流群一起学习交流QQ-536788289
写作不易,如果对您有帮助,麻烦点个star★★★加个关注吧!我会继续努力分享更多ROS2小知识
版权声明:本文为博主机器小狗史努比原创文章,未经博主允许不得转载。
